


Hi everyone!
My last post focused on the importance of machine maintenance, and how that can impact your quilting experience.
But even when your machine is in top condition, the quality of your quilting experience hinges on another important factor, the preparation of your quilt top and backing.
So today I’m going to share both piecing and longarm preparation tips that will increase your chances of having a fun, stress-free quilting experience!
Piecing Your Quilt Top
Accuracy is the watchword for a good quilting experience.
But when it comes to longarm quilting, accuracy is especially important when it comes to loading your quilt on the frame and keeping it square.
Piecing tips:
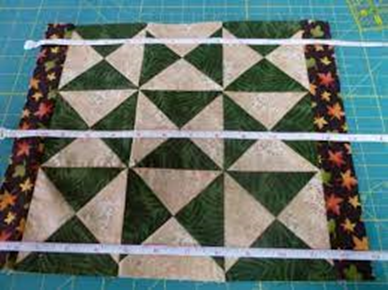
- Make sure the body of your quilt remains square. Measure your quilt in three places: toward each edge and across the middle. Do this for both the width and length. If your three measurements aren’t reasonably equal, check your piecing. Fix as appropriate.
- If you’re adding borders, use your three measurements to cut your strips. If the measurements vary slightly, take an average of the three numbers to determine the length of your strips. This way your side borders will match each other. Same for your top/bottom borders.

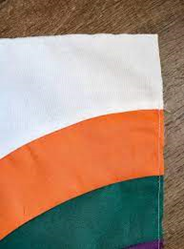
- Attach each border strip by pinning it to the corners and middle of the appropriate edge. Then continue to pin as needed to ease in any fullness. Borders should form a 90⁰ angle at each corner.
NOTE: Do NOT add your borders by simply cutting a strip of fabric and sewing it to the edge of your quilt, then cutting off the excess. This often results in wavy borders with excess fabric that won’t lay flat which may result in puckers when quilting.
Preparing Your Quilt Top
Once your quilt top is complete, prepare it for loading on the longarm.
- Make sure all the seams are secure. Putting your quilt on the frame is going to pull it taut, and you don’t want any holes to appear in the piecing.
- Cut and remove any loose pieces of thread from both sides of your quilt top. If you’ve used light colored fabric in your top, you don’t want to see thread trapped between the top and batting once quilting is complete. You also don’t want threads caught in the quilting or loose threads catching on the longarm’s foot, possibly distorting the quilt pattern.
- Press your quilt top. Remove any creases. Make sure seams are lying flat. This reduces bulk and results in a smooth, even looking quilt surface.
- Square your quilt top and make sure edges are trimmed clean and straight. Again, this will help keep your quilt square as it’s being basted and quilted.
- If your quilt has any seams extending to the edge of the quilt, staystitch or baste the edge of your quilt. Use a normal stitch length and stitch 1/8” in from the edge of the quilt. This secures the edges of your quilt so they won’t pull apart on the frame.
NOTE: Do NOT add embellishments (e.g., buttons, beads, etc.) to your quilt until after it has been longarm quilted. Embellishments can get caught on the thread, break a needle, or cause other more serious machine-related problems while quilting.
Preparing Your Quilt Back
Your quilt back needs attention prior to quilting as well.
- Make sure your quilt backing is 4” – 6” larger than your quilt top on all four sides. (That’s a total of 8” – 12” larger than your top in both length and width.) Why is this important? The top and bottom need excess length so that the longarm’s needle can reach your complete top when adding the space needed for the frame and the machine and carriage. It’s also important for the sides to have enough excess fabric so the quilting design can extend slightly past the edge of the top and so the clamps can grasp the fabric needed to keep the sides of the fabric taut.
- If your back is pieced, use a ½” seam. Press it flat.
- If sewing selvage edges together, cut the selvage off. The selvage does not stretch. This may cause puckering along the seam. (Leave the selvage outer edge intact if you are pinning to this edge on the longarm frame.)
- If the selvage is on the left and right side edges of your quilt back on the longarm frame, clip into the selvage every 8-12 inches with scissors. The selvage doesn’t stretch, your backing may distort as it is rolled onto the frame because the salvage will be tighter stacked on the roller bar.
- Press your quilt back. Remove any creases.
- Square your backing fabric. For details, see the video How to Square Up a Backing Fabric on our YouTube, Angie’s Answers.
Preparing Your Batting
Yes, that middle layer needs a little attention, too!
- Cut your batting at least 4” larger than your quilt top on all four sides. (That’s a total of 8” larger than your top in both length and width.) This allows for any ‘shrinkage’ as the quilt is quilted. It also provides a buffer if the batting was cut unevenly or placed at a bit of an angle when loading on the frame.
- If your batting has been folded or contains creases, place it in the dryer with a damp washcloth. Tumble until any folds are removed. You might also be interested in our Lauarstar Lift iron where you can steam your batting right at the longarm frame!
- If your quilt top contains large areas of white fabric, consider using white batting. A natural-colored batting may cause your finished quilt to look slightly discolored or dingy.
Pinning Your Quilt Top and Back
When using our Quick Zip Zipper System™, here are a few more tips:
- Make sure you accurately mark the middle of your quilt top and back. Then match that midpoint when you start pinning on the zippers. This again will help keep your quilt square.
- If you know your quilt design is directional, or if you don’t know what design you are going to use, place the zippers on the top and bottom edges of your quilt top and back.
- If you know your quilt design is non-directional, pin your zippers to the long edges of your quilt. This will allow you to quilt longer rows of your design. You’ll probably advance your quilt fewer times, resulting in less rows to quilt.
- If you’ve pieced your quilt back, consider pinning your backing fabric so the seams runs horizontally. This distributes the bulk created by the seam evenly across the full width of your quilt. If you run the seam vertically, the bulk rolls on top of itself, making it more challenging to keep your quilt back flat and square.
- As you pin, pick up as much fabric as you can on the length of the pin. Place your pins about a ½” or thumb’s width apart.
NOTE: See The Quick Zip System – Zippers for a Longarm! How to pin to a project in Angie’s Answers for a review of how to pin our zippers to your quilt top and back.
That seems like a lot, doesn’t it? But really, doesn’t it all make sense? And isn’t all the preparation worth it when it results in an enjoyable and successful longarm quilting experience? We think so!
As always, if you have ANY questions or want additional information about the products and services we offer, please call us at (262) 723-6775 or email us at info@QuiltingConnection.com.
You can also visit us online at QuiltingConnection.com or in person at 21 Adams Street in Elkhorn, WI (usually M-F 9-4, please call to confirm we’re open) or 1017 W. Northland in Appleton, WI (W, Th & F 10-4, S 10-3).
Finally, check out our blog at QuiltingConnection.com/blog and our Facebook posts.
Please share your thoughts and questions with us. We love to hear from you!
Angie