


Hi and welcome back!
Can you believe we’re closing out February already? Once we’re into March I feel like spring is right around the corner! Time to start getting out … doing things and going places.
One of those places could be The Quilting Connection. Have you considered renting some time on one of our longarm quilting machines? If you’ve completed a number of quilt tops over the winter months and are ready to quilt them, we’re ready to help!
I know that it’s important to you that YOU get to finish the quilts you make … that means doing the quilting too!
So, if you aren’t ready to buy a longarm yet or can’t currently fit a frame into your quilt space, we’re here to assist by providing the expertise and equipment you need to get the job done!
I can imagine that if you’re new to the longarm experience, you’re wondering just what renting time on a longarm machine involves. Well, that’s the focus of this post! I’d like to take any mystery out of what renting time on a longarm involves.
First – If you haven’t already, take the Beginning Longarm Rental Class
In the Beginning Longarm Rental Class, we provide you with all the information you need to have a successful and fun first longarm quilting experience! You also receive a set of our Quick Zip™ zippers for loading your quilt top and back onto the longarm frame.
In class, we’ll talk about preparing your quilt top and back for loading on the longarm. In fact, we ask you to bring along one quilt top and back to prepare for your first rental appointment. That way you get some real, hands-on experience right from the start!
We’ll cover the basics by showing you how to square your backing fabric and how to pin your zippers onto your quilt back and top. You’ll get that started during class and then be ready to finish pinning at home so you’re ready for your first rental appointment.
But there’s more …
We also talk through batting and thread options, considerations involved when choosing different types of backing fabrics, and how to decide the best way to load your quilt on the frame … sideways for fewer, longer passes or top-to-bottom due to directionality.
And you’ll get to participate in some hands-on quilting practice. We want to make sure you understand and experience the three methods of quilting that are available to you: free-motion, pantograph and computerized.
We’ll sprinkle in some quilting and longarming tips throughout the class. Then finish with you selecting the thread, quilting method and quilting design for your first rental appointment … which we’ll schedule right then and there!
It’s a fun, informational half day experience! To join us for a Beginning Longarm Renters Class, see the Classes page of our website. Classes are scheduled to meet your needs.

Now you’re ready to rent!
It’s your first rental date! You walk in the front door of The Quilting Connection with your quilt top and backing fabric pinned to your Quick Zip™ zippers. Maybe you have your batting and quilt binding with you. Now what?!
Our team member will have the longarm machine ready to go. She’ll confirm your thread and quilting design choices and then cut the batting if you’re buying it from us. She’ll also wind a bobbin or two of the thread you selected.
Time for action!
Loading your quilt on the longarm
First, you load your quilt back … and we’re there to help. You’ll zip the bottom zipper to the front belly bar, drape the backing fabric over the back bar of the frame, and start rolling your quilt back onto the front bar. We’ll assist you in making sure the fabric rolls flat and square.

Once rolling the backing fabric is complete, you attach its top zipper to the top leader of the frame.
Next, you load your quilt top. You’ll zip the bottom edge of your quilt top onto the remaining front bar of the frame, drape the top over the back bar, and start rolling. Again, we’ll assist you as needed to make sure your quilt is rolling flat and square.
Finally, you load the batting.
- We’ll initially lay the batting on top of your quilt, centering it from side to side and positioning the top edge so it lays even with the top zipper of your backing fabric.
- Then we’ll roll the top edge of the batting back and gently push it between the two bars holding your backing fabric and quilt top.
- To finish, we’ll fold back your quilt top, smooth out the batting, and lay the top edge of your quilt top back in place.

Setting up the longarm for quilting
The next few steps involve a little teamwork.
- Either you or our team member will adjust the side clamps to fit your quilt.
- We’ll load the bobbin and test the tension.
- Then, either you or our team member will baste the top and side edges of your quilt.


Now the process varies a little depending on the style of quilting you’ve chosen.
If you’re free-motion quilting, you’re ready to go!
If you’re following a pantograph pattern,
our team member will load the paper pattern, note the starting and ending points on the pattern, place guides along the bottom and sides of the pattern to help you while quilting, and set clamps on the frame creating stop points on each side of the quilt for the longarm head.
If you’re doing computerized quilting (i.e., using Pro-Stitcher),
our team member will open the quilting design you’ve chosen, ask you what size you’d like the design to be and how much space you’d like between each row, build the quilt to size, set up the quilting space and area, ask you how you’d like to adjust the positioning of the design for the top edge and sides, crop out any excess design, and save a copy of the complete layout.
The Pro-Stitcher computer has a "Stitch Stats" button that we use to estimate how long the stitching will take. Some patterns take more time than others so with Stitch Stats it is not a surprise for the cost at the end.

Setup complete! Most first-time renters are surprised by the amount of setup involved, but once you see the full process, it all makes sense.
Quilting time!
Now, if you’re doing pantograph quilting or using the computer, you’re ready to quilt.
If you’re doing pantograph quilting,
either you or our team member will bring the bobbin thread up on the front side of the machine, and you’ll start quilting from the back side, following the pantograph pattern.
If you’re using the computer,
our team member will tell Pro-Stitcher to start quilting, bring up the bobbin thread when prompted, and let the computer take it away!
Reaching the end of the row
As each row of the quilt is completed, there are a few more steps to follow:
- you’ll remove the side clamps,
- advance/roll the quilt for the next row of quilting,
- baste both sides of the quilt, and
- reattach the side clamps.

If you’re pantograph quilting,
our team member will assist you as needed with realigning the quilt pattern and/or bringing up the bobbin thread so you’re ready for the next row.
If you’re using the computer,
our team member will realign the quilt pattern, move the start point on the computer, tell Pro-Stitcher to start quilting and bring up the bobbin thread.
Now it’s just a matter of repeating these steps. Depending on the size of your quilt and the density of your quilt pattern you may have a bobbin change or two during the process.
Reaching the end of the quilt
Once you reach the last row of your quilt, we need to make some adjustments so the longarm only quilts the portion of the design needed to finish your quilt top.
When you advance your quilt for the last row, you’ll unzip the quilt top’s zipper and remove your pins. Then either you or our team member will baste not only the sides of your quilt, but also all along the bottom edge.
If you’re pantograph quilting,
our team member will assist you in marking which part of the pattern you need to follow to complete the quilt. Then either you or our team member will bring up the bobbin thread and you’re off on your last row!
If you’re using the computer,
our team member will realign the quilt pattern, crop off any excess design in the length of the pattern, tell the computer there’s a new start point, start Pro-Stitcher and bring up the bobbin thread. And the computer will be off completing your last row!
Adding the binding
This step is optional. If you’d like, you can sew your binding onto the front of your quilt so that you just have to finish the binding on the back when you get home.
If you choose this option, we’ll roll your quilt back up to the top, possibly change the foot on the longarm, match the middle of your binding to the midpoint on the top leader and make sure there are no seams in the binding strip at each of the corners, and start stitching across the top edge of the quilt.
Then we simply keep advancing the quilt after sewing the binding on each side.
Check out my YouTube vidoe for attaching binding here:
Once you reach the bottom edge of the quilt, we’ll complete the last two corners and stitch along the bottom. You can either leave the two binding tails open for you to close on your domestic machine or use the overlap method to close your binding while on the frame.
That’s it! We’ll unroll your quilt and unzip it from the frame. You can remove the zippers and trim off the excess back and batting at home on your own time.
Oh, and we’ll take a picture of you and your quilt to share on Facebook and add to our album of beautiful quilts completed by our renters!
REMEMBER: Our staff is always there to help! We’ll assist you at any and every step of the process. However, we’ll also encourage you to do as much of the quilting as possible … this is YOUR quilt!
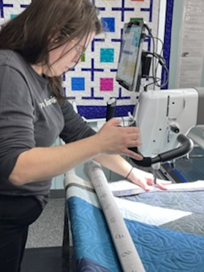
Pictures help so much!
Thanks to our Appleton store manager, Jennifer George, for snapping a few pictures of our renters in action!
So, what do you think? Is this a workable option allowing YOU to finish your own quilts? Please let me know if you have any questions!
Time to wrap up. Here’s the latest on our upcoming classes, events and sales!
Upcoming Classes

Hands on Quilted Jacket Class with Sara (Appleton)
Saturday, March 22, 2025
9:00 AM – 4:00 PM
(Lunch included)
Have you ever wanted a quilted jacket but didn’t know where to start?
Here’s your chance to find out!
***********************************************************


How about joining me at Fabric Bash in Omaha, NE for 1 or 2 in-person classes?!
Pro-Stitcher Beginner’s Class Pantograph (Omaha, NE)
Wednesday, March 5, 2025
9:30 AM – 4:00 PM
or
Pro-Stitcher Custom Quilting (Omaha, NE)
Thursday, March 6, 2025
9:30 AM – 4:00 PM
Click the links above for even more information on these fantastic opportunities!
Upcoming Events
Our March calendar of quilt shows gives you all sorts of opportunities to get out and see the latest the quilting world has to offer!
 West Suburban Quilters' Guild
Friday, March 14, 2025
10:00 AM – 6:00 PM
Saturday, March 15, 2025
10:00 AM – 4:00 PM
Waukesha County Fairgrounds-FORUM BUILDING
1000 Northview Road
Waukesha, WI 53188
Admission: $7
********************************************************************

911 S Saint Augustine Street
Pulaski, WI 54612
Admisson $5
*********************************************************************

Saturday, March 29, 2025
9:00 AM – 4:00 PM
Lourdes Academy
110 N Sawyer Street
Oshkosh, WI 54902
Free admission / Free parking
**********************************************************************
 Crazy Quilters, Inc.
Saturday, March 29, 2025
9:00 AM – 4:00 PM
Sunday, March 30, 2025
10:00 AM – 3:00 PM
Parkview Middle School
930 N. Rochester Street
Mukwonago, WI
$8 daily admission
$10 two-day admission
Can you make it to a show or two? Please stop by and say hi!
NOTE: Due to staffing these shows and pulling inventory from our shops, the Appleton store will be closed on the following Fridays: March 14th and March 28th.
Sorry for any inconvenience this may cause!
Sales! Sales! Sales!
Handi Quilter has a new promotion running. ALL their machines and Pro-Stitcher are on sale right now!

This sale goes through March 8th! Contact us for more details!
*************************************************
APQS also has a new promotion for March.
They’ll be offering free power fabric advance and free overhead lights.
That’s a $3,200 value!
We’ll be sharing more information on this sale soon. Watch for our emails and Facebook posts!
Quilt Path is on Sale through the end of March! Save $4,000!

That’s everything for now!
Please remember, if you ever have ANY questions or want additional information about ANY of the products and services we offer, please call us at (262) 723-6775 or email us at info@QuiltingConnection.com.
You can also visit us online at QuiltingConnection.com or in person at 21 Adams Street in Elkhorn, WI (usually M-F 9-4, please call to confirm we’re open) or 1017 W. Northland in Appleton, WI (W, Th & F 10-4, S 10-3).
Finally, check out our blog at QuiltingConnection.com/blog and our Facebook posts.
And please share your thoughts and questions. I’d love to hear from you!
Angie